4:34


So, in today's video, we are running back the $50 meal prep challenge, but I have a brand new set of all very standard ingredients that I'll be transforming into a week's worth of food. And honestly, the meals created this week have absolutely no business being this good on a $50 budget. Things got a little bit ridiculous. And of course, if you want to follow along, I have the entire meal plan and all the recipes below in a free Google doc. All right, so a lot of you enjoyed the first $50 meal prep video, but there were two comments that really stood out to me. The first was from Walker the Wild asking if I could pull this off using more barebone kitchen equipment. So, for every single meal in this video, outside
of basic stuff everyone already has, like bowls, knives, cutting boards, and utensils, I'm only using a couple pots and pans, a blender, and a hand mixer, which isn't even required. The second comment from Shub wanted to see different cuisine themes, specifically recommending a Mexican inspired meal plan. And honestly, once I started thinking about the possibilities of Mexican food on this tighter budget, I got very excited because it's a cuisine built around turning humble ingredients into incredible meals. So, just like last time, I used my local grocery store as a baseline for this $50 budget. If you're using organic ingredients, the prices will go up around 15 to 25%. And
here's what we're working with for the week. We've got a nice mix of veggies. We've got our dairy and eggs, a few canned staples, a bag of dried black beans, and one of the best budget proteins you can buy. Around a 5 to six lb bone in pork butt. Now, the bone isn't necessary, but I'll be using it for a little flavor hack later on. And if pork isn't your thing or you can't find it, you could easily swap it out for another affordable cut like a beef chuck. And then we have our final ingredient, a big bag of masaharina, which is a niximalized corn flour. And while the first meal prep video really revolved around a whole chicken, at the core of Mexican food is corn. And so many iconic meals evolve from it. But
one very super important time-saving note. I am going to be making homemade corn tortillas, which is a little bit of a labor of love. So, if you want to save yourself some time and you don't have a tortilla press, you can absolutely just buy a couple bags of corn tortillas from the store, which are usually pretty cheap. All right, so day one is all about prep work. That's really going to set us up for some incredible meals throughout the week. And the very first thing I'm going to be doing is soaking this entire bag of dried black beans overnight so they can fully hydrate. Now, if you do want to speed things up, you could absolutely just use your pressure cooker like I've done in a bunch of other videos, but
today we're keeping things old school and sticking to the barebones equipment challenge. I also like to give my cilantro a really good wash and spin cycle because cilantro from the market usually has a surprising amount of sand and grit in it. And also pick out any wilted pieces, wrap it up in a dish towel, toss it in a ziploc bag, and that is ready to go for the entire week. And now it's time to prep this pork butt, which is actually not the butt of the pork. It comes from the shoulder of the pig. It's well marbled. It's nice and fatty, which you can see here. And since there is a bit of excess fat, I'm going to trim that away first. And I'm going to save that. And I'll show you what
we're going to do with that in just a second because we certainly do not waste any animal fat around here. Then I'm going to start cutting the pork down into smaller chunks for brazing. And honestly, I was hoping this bone and pork butt would come with a much bigger bone than this tiny little thing. But hey, we're still going to squeeze whatever flavor we can get out of it. And that just means we have a little bit more meat to work with. And I'm aiming here for roughly 2in cubes. Nothing too precise, just relatively even pieces so they cook at the same rate. And once that's done, I'm left with my pork chunks plus all of those extra fat scraps and this little bone, which I'm
going to toss into a small pot. And I'll just cover that with water. And I'll bring it up to a medium low heat. And as those scraps slowly heat up, they're going to release a bunch of scum to the surface, which I'll start to skim off until the liquid eventually turns more clear like this. And then for the next few hours, I just want this sitting at a very gentle simmer to slowly render the fat and pull flavor from the bone. You definitely don't want this boiling aggressively or that liquid is going to emulsify. All right, now back to the pork itself. We're making a pork tingga today, which is basically a smoky braced pork cooked down in a spicy tomato sauce, which works so wonderfully with
the ingredients we have on this budget. So, the first thing I'll do is season these little pork chunks generously with salt and pepper. Then, I'll get my Dutch oven ripping hot. I'm going to add in some oil and start searing off the pork in two batches. And while that's happening, I can prep my veggies. We've got some onion, some jalapeno, seeds removed for a little less heat, or don't if you're into that, and a few cloves of garlic. And once that first batch of pork gets a nice deep sear, I'll put it on repeat with the second batch. Then I'm going to toss in the aromatics right into the pot and salt them up a bit. And after a few minutes, when those aromatics are softened and nicely
caramelized, I'll add in a half can of the fire roasted tomatoes that I have. And this right here, chipotle peppers in adobo sauce. This is our secret weapon. You get a super smoky, spicy, acidic flavor for very little money. So, I'm going to toss in a few of the actual chipotles, those smoked jalapenos, along with some of that adobo sauce. I'll add a little bit of water, and I'm going to return the pork to the pot. And finally, I chopped up some cilantro stems, which I'm going to throw in, which actually hold up great in a longer cook, and they'll add great flavor. And I'll just let that braze for the next few hours,
which gives me a ton of time to work on other dishes. So, the first little side condiment we're going to make is a super simple blender salsa. I'm using the rest of the can of the fire roasted tomatoes. Then into the blender goes half an onion, a few cloves of garlic, the rest of that jalapeno that I had sliced up already from the pork breath, big handful of cilantro, the juice of one whole lime, and I'll season that up with salt and pepper and blend everything together. Just enough to break down those veggies into a smooth salsa. We're not making a salsa smoothie here. You still want a little texture. I remember my brother first made salsa with canned tomatoes in a blender. I couldn't
believe it. I'm like, I didn't know you could do that. And then I realized that's how like every Mexican place makes their, you know, house salsa. Like, oh. All right. So, moving on to the next condiment. And we need to get the absolute most out of this one single avocado. So, sadly, guac is definitely off the table. Maybe if I lived in Mexico and avocados cost 25, but not here, baby. This $50 budget could afford me one avocado. So, instead, we're stretching this thing out to the absolute limit by making an avocado crema. Into the blender goes the avocado, some cilantro, a few scoops of sour cream, and the juice of half of a
lime. I'll season that up with salt, and I did sneak in a little apple cider vinegar to bump up those acidity levels since the limes are so precious on this budget. Then I'll blend everything together while slowly emulsifying in some avocado oil. That avocado is going to thicken things up really fast. So, what I do is I just add enough water until it gets that smooth squeeze bottle consistency that I'm looking for. Now, it's been a few hours, so it's time to check in on that pork fat. And most of the fat has melted down into a liquid. So, I'm going to strain everything off into a container, and I'm just going to pop that right in the
fridge overnight. That way, the fat will actually solidify on the top and separate from the stock underneath. And the final thing we need to do for day one prep is just check back in on that beautiful slowcooked pork. All right, so I have to tell you about how my cast iron game has completely been revolutionized by the sponsor of today's video, Victoria Cookware. These are by far the most inspiring cast iron pots and pans that I have ever used, and they've really revamped my love for cast iron cooking. If you just take a look at this classic 10-in skillet right here, this thing is a thing of beauty. The design feels super modern and refined with this slightly curved ergonomic
handle that has this built-in heat brake that keeps the handle from getting super hot while you're cooking. Plus, it has these nice little drip-free pore spouts, making transferring sauces a breeze. And it's made with their proprietary spherous iron, which makes these pans extremely durable. But honestly, my favorite part is the cooking surface. It hits that perfect balance between a smoothed and textured surface. And every single pan comes preseasoned with three layers of flax seed oil right out of the box. So, it's wonderfully non-stick and it's lighter than your classic cast iron pan. So, when you combine all of these elements together, it really turns into an everyday all-purpose workhorse in the
kitchen. And that versatility carries across their entire lineup. So, if you want to check them out, just click the link below and use code Mike15 and you can get 15% off the entire Victoria cookware store. All right, it's day two and the first thing I'm going to do is get that pork fat out of the fridge. And you can see that top layer has solidified into some nice super pure pork l. And I'll remove that top layer of fat, which should be just enough to use in my tortillas. And I'll be keeping this little pork liquid in the fridge to use later on for some tamales. And now we're moving on to some homemade tortillas for some tacos and a few other fun dishes. And like I mentioned
earlier, buying a couple bags of corn tortillas is absolutely the faster move. But if you want to get as much as you can out of this budget and you just want a much better product, you got to make the tortillas from scratch. So into a large mixing bowl, I'm going to add in my masa. And proper corn tortillas need a little bit of fat. So I'm adding in this beautiful rendered up pork fat. And finally, some salt. And I'm just going to work the fat into the masa almost like you're making a pie dough. After that, I'm going to slowly mix in some warm water. At first, it's going to seem a little dry and crumbly. So you just want to keep working in that water, and eventually you'll get a super soft,
pliable dough. It should feel just like a fresh batch of Play-Doh. And I'm talking a fresh batch, like right when you pop the top, not the crusty Play-Doh that's been sitting in my house after my kids leave the lid off for the 900th time. Now, I'm going to let the dough rest for about 15 minutes before we start pressing tortillas. And I'm using a cast iron skillet here because tortillas cook best on a nice high consistent heat and so this dough doesn't stick to the tortilla press. I'm using a cut open plastic bag. And honestly, tortilla making is all about rhythm. You roll, you press, you peel. About 45 to a minute on the first side, 30 seconds on the second side, then back to the first side one more time to
finish them off. And when everything goes just right, you get these insanely tender, steamy, puffed up corn tortillas. Now, right before I start absolutely demolishing these tacos, I'm going to make one of my favorite budget friendly sides of all time, which is a nice fresh sllo. And half of this cabbage is more than enough. And so, I'll save the second half for other recipes. First, I'll remove the core and I'll slice everything up nice and thin. I'll add my cabbage to a nice big mixing bowl. I'll add in the juice of half a lime. I'm grating in one garlic clove. I'll add some finely chopped cilantro, a few spoonfuls of that sour cream. I'll season it up with salt and pepper. Then
I'll give everything a really good mix. And I like to massage and almost break down that cabbage a bit so it softens up slightly and really absorbs all that flavor. And finally, now that I have this sllo, it is taco time. Carly's cutting into my meal prep right now with this. going to have to give her a sample. Oh yeah. So good. I love it. All right. So, it's day three and the first thing I'm going to do is work on those black beans, which are now fully hydrated. And I'm just going to simply add them to a large pot with a few pieces of onion, a few cloves of garlic, and I'll cover them with some fresh water. And I'll throw them on a medium low heat to cook for around 2 to 3
hours. The goal is for those beans to really hold their shape so they're not falling apart, but also be nice and tender. So, if you pick one up and you put it in between your fingers, it should smush pretty easily. And now that I have this big batch of perfectly executed cooked black beans, I'll be taking advantage of these in a few different dishes. So, next I'm going to be tapping into this can of corn right here with some Masa Jalapeno cheddar cornbread biscuits. To a mixing bowl, I'm going to add some sour cream, a few eggs, a little bit of sugar, and some oil. Or you could also use butter. Then I'm going to add in about half of the corn, plus a little bit of the liquid from the can as well. Because at this
point, we are extracting flavor from everything. I'll give that a mix. Then I'll add in some masa, a little baking powder and baking soda. And finally, some salt. And I'll mix that together to create my batter. Then I'm going to tap into some of that Monterey Jack cheese I have. But honestly, any good melting cheese will work here. And finally, I'll chop up some jalapeno, nice and fine, and add that to the mix. Now, the key I found here is letting that batter rest for about 15 minutes before cooking. That gives the baking soda time to activate a bit, which I find helps create a softer, fluffier texture. And of course, we're making this thing right in the cast iron. So, I'll melt down
some butter and then I'm just going to ice cream scoop that batter right into the pan. And I'll let it cook for just a few minutes to start building a bottom crust. Then the entire pan goes straight into the oven to finish baking. That was a fail. They broke apart at the seams. Look how moist and fluffy that is. And then you get this kind of cheesy crispy crust on the bottom. That is even improved from the recipe testing, I would say. So, right out of the oven, these are an absolute delight. They're sort of cornbread meets biscuit type of vibe. They just have so much flavor packed in that you don't need to serve them with anything. Although these suckers with the pulled pork is such a beautiful combination.
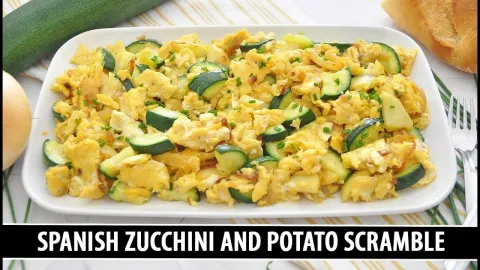
All right, so we're moving right into some floutas. Now, technically I could use the rest of the pork for these, but I'm saving that for something very special later on. So instead, we're switching things up and making a vegetarian filling. I'll dice up 2/3 of the remaining cabbage. And I've got two zucchini that I'm going to chop into small pieces. I'll get my pan on a high heat. I'll add in some oil. And I'll start cooking down that cabbage first since it's going to take longer than the zucchini to cook. And once that cabbage starts getting nice and soft and caramelized, in goes that zucchini along with some cumin seeds, some paprika, a little bit of garlic, and some salt. And the key here is to really cook this
mixture down. You want that deep caramelized flavor, but you also want these vegetables to be soft enough to make a really nice cohesive filling. And I've got to say, for a really inexpensive vegetarian filling, this is absolutely delicious. Now, to bring these floutas together, I'm using some of the tortillas we made earlier. But after sitting in the fridge overnight, they've stiffened up a bit. So, I'm just going to wrap them in a damp towel, and I'll microwave them for about a minute to make them pliable again. Then, I'll fill them up with the veggie mixture, roll them up tightly, and place them seamside down on a baking sheet.
Now, to go along with these flour toss, I'm making a reffried black bean sauce. I'm simply going to cook down some onions, garlic in a pan with some cumin seeds, and salt until it's nice and caramelized. Then, I'm going to add in one chipotle pepper. I'll dump in some of those cooked black beans. And I'll blend everything together until it's smooth and creamy. I'll season this up with some lime and a little bit more salt. And I do like to slowly cook this down for about 30 minutes to an hour to really deepen those flavors. All right, it's day four and we're making something I've been thinking about since the theme of this video is official. Some pork tamales. So, I am cheating a little bit here and I'm
dipping into another batch of pork fat that I already had on hand because tamales need a good bit of fat. That's what gives them that soft, rich texture. And unfortunately, I used all of my pork fat for those tortillas. And the first thing I'm going to do is just whip up that fat using a hand mixer, but this could easily be done with a whisk as well. Then I'll add in my masa. I'll add in some baking powder and some salt. And remember that pork stock that we separated from the fat earlier. I warmed this up in the microwave and I'm going to slowly whisk this in until you get a thick cake batter like consistency. Now traditional tamales of course are steamed in the corn husk. But those
weren't exactly in the budget today. So parchment paper is going to step in and do the job just fine. So I'll cut a few sheets about 6 to 8 in wide. I'll spread down some of that tamale dough. I'll pile on that leftover pork filling. Then I use the parchment paper to help roll everything together tightly. Then I just keep on rolling, gently compressing everything together. And I'll tuck in the sides. And these tamales are going to get stacked on a steaming rack right inside my Dutch oven with just a shallow layer of water on the bottom. All right, so these are all of the ingredients I have left over to use this week. It's already been a absolutely delicious week of meals. Kind of exceeded my expectations and I think I
have the perfect two meals to use up everything. Got some black beans, corn tortillas, few little scraps of veggies, a little scrap of cheese, some salsa, and I barely used any eggs. That's kind of surprising. So, I don't know if I'll use up all the eggs, but you know, it's never a big deal to have a few extra eggs lying around. All right, we're turning the very last of these tortillas into just an absolutely delicious breakfast. I'll slice up the leftover tortillas. I'll throw them in the air fryer. I'll spray them with some oil and I'll air fry those into some nice crispy tortilla chips. And for the sauce, I'm pouring in the last of my salsa that I had left over. Then I'm adding a little
water to the container to rinse out every last bit of flavor before dumping that into. Then I'll add in a few of those chipotles along with some of that adobo sauce and even a splash of that canned corn liquid is going in since I'm scrapping for flavor out of absolutely every ingredient possible right now. Then I'll blend everything together until nice and smooth. This was Carly's recommendation, so she had to come in for a taste test. I'm so excited. I've never had this dish in my life.
What? Yeah. Never. It's like my favorite. I feel like it's such an underrated Mexican dish. Yeah. When I was making it, I'm like, it's kind of like fried rice meets nachos. Like every culture, you need a way to use up like the carb and the egg, you know, and this is such a good way. I already know it's going to be freaking out of control. Oh my god. It's nice how they kind of they're still like a little crunchy with chips, but then they are a little soft, too. Oh wow. Oh yeah, that is so good. I'm dreaming about this. In Mexican cuisine, there's so many dishes that sort of soak the tortilla in a sauce that I feel like aren't super popular in like TexMax or more American.
Yeah. We're very used to our crunchy tortillas here. Yes. The soft texture, but they're like made for soaking up sauce. Yes, they really are. I mean, the only thing that could benefit from Can you read my mind? M pickled onions. Yes. All right. So, to wrap up this entire meal plan, I'm using all my final ingredients in a black bean dumpling soup. I got a pot on a medium heat, added in my oil, and then I chopped up the rest of my onion, garlic, cabbage, and jalapeno, and just got that caramelizing for a few minutes. Then, I added my black beans, the rest of my corn, a little bit of water, and I popped the lid on that and cooked it for about 15 minutes. Then, I seasoned everything with salt and pepper, added
the last of my cilantro, gave it a little blendy with my immersion blender. Then, I grated in the last little nub of cheese I had. Finally, I had some leftover tamalei dough, which I didn't use. So, I thought it'd be fun trying to make a little soup dumpling with it. So, I spooned in a bunch of those and let them cook with the lid on for about 20 minutes until they were cooked through and my dumpling soup was ready to go. All right. Now, this challenge I actually did a better job than last challenge. All I have left is this tamale dough. Little bit of extra masa, which I'll use. And let's give this a try.
M. Confirm that tamalei dough works nice as a soup dumpling. Look at that right there. Challenge complete. If you want all the recipes and the ingredients, just click the link below for the free Google doc and check out this video if you want more from this series.