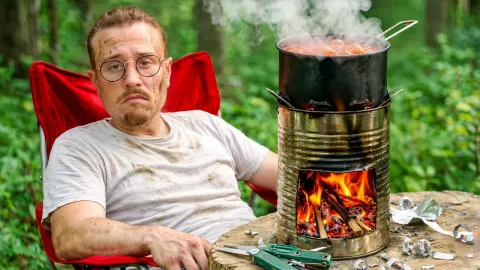
3:07


So, this cigar right here started as a tiny little sprout in my garden and took about 1 year to get to this point. And today I'm going to answer the question, was it worth it? Because everyone knows what a cigar is, but not many people know how they're made from start to finish. And over the last few years, I have been obsessed with growing tobacco and crafting cigars with it. So, I'm going to take you through my entire 1-year process from growing the tobacco to harvesting the leaves to curing them for cigar rolling and finally aging cigars to perfection. Welcome to my journey from seed to cigar.
Now, before we jump in, it's important for me to mention that this video is meant for educational and entertainment purposes and for people over the age of 18, which is pretty much like 98% of my audience. I also want to make it clear that this video is not intended to promote smoking. I don't just grow tobacco to smoke it. I actually smoke very little of it. The main reason I've been growing tobacco and crafting cigars over the last few years is because I find the process itself fascinating. It requires a ton of skill, patience, and a lot of craftsmanship. And just like with all the effort I put into gardening and growing food, I like to have as close of a connection to anything I consume or
put in my body and understand exactly how it's produced. Now, tobacco actually belongs to the nightshade family, the same plant family that includes tomatoes and peppers and eggplants. It's actually surprisingly similar to growing tomatoes. But, of course, the biggest difference is a tomato plant flowers and from that flower grows a beautiful, delicious fruit. Whereas, tobacco has no fruit. This plant is all about the leaves. And after millions of years of insects feeding off those leaves, tobacco plants evolved a chemical defense mechanism to protect themselves, similar to capsicum found in peppers, but in tobacco that defense chemical is an alkaloid called nicotine. And nicotine is produced in the plant's
roots and then transported up to the leaves where it's stored in the leaf tissue. So, when insects start chewing on those leaves, nicotine acts as a powerful neurotoxin, completely overwhelming their nervous system, often paralyzing or killing them. But, it turns out humans had a much different experience with this chemical. They quickly discovered that when tobacco leaves were either smoked or chewed, the nicotine produced psychoactive effects. And because of these desired psychoactive effects, tobacco became widely used by many indigenous cultures of the Americas for either medicinal purposes, spiritual practices, or ceremonial rituals. And tobacco cultivation spread throughout both North and South America. And then when the Europeans arrived in the late 1400s,
back to Europe. And by the 1600s, tobacco was being grown, traded, and consumed all over the world. Now, before we get into the growing, it is very important that if you're interested in growing tobacco, you of course want to check with your local laws to see if it's legal to grow because it is illegal to grow in certain places around the world. Now, where I live, it is legal to grow tobacco for personal use. But, to be honest, I never thought it was possible to grow in this climate here in zone 7A. Historically, when I think about tobacco cultivation, think of places like Cuba or the Dominican Republic, which are famous for cigar production, but of course have tropical climates. Or more southern
states in the US like the Carolinas or Georgia, which have long histories of large-scale tobacco farming, not New York. So, it wasn't until I built a greenhouse that I thought, "Okay, maybe this is a possibility now since the greenhouse gives me a longer growing season and effectively adds another zone or two." But, what I realized quickly is that tobacco can actually grow in a lot more climates than people think. In fact, not that far from here, the Connecticut River Valley was once very famous for producing extremely high-quality tobacco, specifically shade tobacco, which was used for premium cigar wrappers. And since I have started growing it, I've done a lot of experimentation both inside my
greenhouse and outside in the garden. And interestingly, I've actually found more consistent success just growing it outside. So, if you start your seeds indoors before the last frost and transplant them out once it's warm, you can realistically grow tobacco in a zone as low as five, which includes a lot of places in this country and all over the world. Now, of course, you first got to get your hands on some seeds. And there are tons of different varieties depending on the climate, flavor, leaf size, nicotine strength. I usually just pick cultivars that are grown specifically for cigar making. And I
like to experiment to see what grows well in my environment. And once you've successfully grown tobacco one season, you can dry the flowers and harvest the seeds and use them again for the following year. Now, tobacco seeds are like the tiniest little seed you will ever handle in your life, which makes planting them a little bit more tricky. To start them indoors, I use some of these plastic cells and some seed starting mix. And I make sure that seed starting mix is pre-moistened. And since the seeds are so small, you're never going to isolate just one seed. So, I just sprinkle a few on the surface as evenly as possible and then just give them a very light coating of some soil.
Or you can use another medium like vermiculite or some worm castings. And just like those other nightshades that are warm summer crops, tobacco needs warmth to germinate. So, I place it on a tray on a heating mat. And I put a humidity dome over top. Then I just monitor them and in about a week you'll start seeing these super tiny little sprouts. And once they're bigger, I'll thin them out to one plant per cell. And at around that 4 to 6-week stage, the seedlings are strong enough to go outside. Of course, you want to harden them off before so they acclimate better to the outdoors. And when you're picking a spot to plant them, you want to make sure you're giving tobacco plants space
because tobacco gets huge. Now, some varieties do stay smaller, so if you're tight on space, you might want to look for one of those. So, I'll just plant them in some good compost. And you can fertilize them just like you would a tomato, but definitely give them some room to spread out and feed. Now, I will say, last year when it was warm enough, we experimented with just tossing some seeds in the soil and they actually germinated really well. You might have a higher success doing that than starting them inside. And then what we did was when those seedlings got big enough, we just transplanted them to different places in the garden where we wanted them to grow. So, after growing for about 6 to 8
weeks, the plants start looking like this. This is the early growth stage where they're still establishing that root system. Then at about 10 to 12 weeks, you start seeing that plant really take off when the roots are established and the weather starts really warming up. They're going to put on a ton of growth pretty quickly and it doesn't take long for plants to get up to a few feet tall depending on the variety. And then at about 10 to 14 weeks, you're going to have some massive tobacco plants taking over your garden. Now, around this time, you should start seeing tobacco flowers emerging from the top of the plants, which happen to be super beautiful. I generally top them off, but if you're saving seeds, you
would let one plant flower and let it dry out so you can harvest those seeds. Now, we're going to move on to one of the most important steps of this process, which is harvesting the leaves. Now, once the leaves have matured and the plants begin to flower, you'll start noticing something interesting. Beginning at the bottom of the plant, the leaves start to ripen. It's kind of similar to how trees transform in the fall. They start green, then they transform to either orange, yellow, or red. Then they dry out to brown. Tobacco does something very similar. You'll begin to see a slight yellowing in the leaves. And this is the ripening process. And it is essential for proper
processing later on. Now, naturally, if you didn't harvest the leaves at all, this process would continue on its own. The leaves would go fully yellow, then they would dry on the plant and just fall off and compost into the ground. That's technically one path to take, though it's not how tobacco is usually processed. Now, if the leaves don't begin yellowing before they dry, a lot of that chlorophyll stays locked in the leaf. And when that happens, the tobacco never goes fully brown. It cures to a greenish color and can produce a much harsher and more bitter smoke. So, picking the leaves at the right time is very important. But, I will say, I've experimented with picking these leaves
at a ton of different ripeness levels. And what I've learned is that the most important thing is that ripening process has at least started on the leaf. As long as you're seeing some of that green to yellow transition before you're picking, you're usually in a good place to harvest. And the best technique for harvesting is to do it in stages because the ripening starts from the bottom leaves first. So, every few days as I see those bottom leaves start to ripen, I'll go around and harvest all the lower leaves. when the next set is ready, I'll go around and harvest those until eventually the entire stock gets stripped of its leaves. So, growing and harvesting the tobacco is one thing. Then there's the
processing part. And a lot of transformation is taking place in this processing stage. The leaves are going to turn from green to yellow to then brown. The starches in the leaves are going to convert to sugars, proteins are going to be breaking down. And all of these chemical changes are what eventually will create the flavor, aroma, and burn qualities of the tobacco. Now, traditionally, tobacco leaves are hung and air-cured, usually in a protected structure like a barn where they're shielded from rain and any excessive sunlight, but can still get plenty of airflow. And I've tried to do this many times. I've hung leaves in my greenhouse, I've hung them in my garage. And things always start off really well,
but eventually the tobacco develops some type of mold because it's really hard to control the proper temperature, humidity, and airflow you need to properly cure outside. So, what I like to do instead is something called the towel method, which works really effectively for small batches. Basically, you stack the leaves inside a clean towel and wrap them up loosely. Then every day, it's very important to go through that bundle and turn each leaf over. This prevents the moisture from building up in one spot where mold could start growing. And our towel creates a really nice environment where it's slowly pulling out moisture from the leaves while still keeping things controlled enough for the curing process
to happen. And I find this process is really fun just going through every day because you'll start to slowly notice that transformation where every single day that green is slowly converting to more yellow as they ripen. And if a leaf is picked too early and it's just not turning to yellow, it's staying green, you can just discard it. And the same goes if you start to see mold happening, immediately get rid of that before it spreads to your other leaves. And once the leaves have fully ripened to yellow, then they begin to dry further and transition into that classic brown tobacco color, which is finally when they'll start smelling like actual tobacco. And because this is a homegrown
operation, you'll notice I have a ton of different shades of brown and yellow, even some green mixed in. Every year I get a little better, but I'm definitely no expert here. Now most professional cigar making operations are going to ferment the leaves. This is where the cured leaves all get stacked on top of each other in some type of temperature and humidity controlled room. And the tobacco actually starts to heat up and ferment on its own getting the temperatures around 100 to 130° Fahrenheit. Now you can set up a little small scale fermentation system if you want to ferment your leaves at home. I have not set that up yet, but I do now have this fermenting cooler which would be a
perfect place for it. So I think I'm going to try that next year to see how these flavors transform through fermentation. But you don't need to ferment the leaves, you can skip right to aging which is still going to give you a great final product. And what I do for aging is I just stack all of the leaves together. I wrap them up and I put them in my humidor which of course is built to age tobacco products at the right temperature and humidity. And the amount of aging you want to do is completely up to you. Really high-end cigars are aged for years. Even one to two months can make a very noticeable difference. For this batch I let the leaves age for about three months before rolling.
All right, so I've got my aged tobacco and the time has finally come to roll up a cigar. Very exciting stuff and I remember the first time seeing this process done on a trip to the Dominican Republic many years ago and I was blown away by the craftsmanship and speed that these older men could roll cigars. Just banging one out after the other which is probably a result of decades of dedication to this craft. The way I personally learned, of course, was on YouTube from the legend himself, Bliss Cigar Co. And even if you never intend to roll a cigar in your life, which is probably most of you watching, his content is a great watch. It's absolutely mesmerizing. He barely speaks at all. It's just an overhead camera
documenting the process of rolling different styles and types of cigars. And you can certainly pick up on the basics of cigar rolling from just watching his content. And to be very clear, I kind of suck at this compared to what this guy's banging out. I've only done it three times at this point, but I do get a little bit better and definitely more comfortable every single time I do it. of the main things that becomes clear right away is you can take the craft as deep and as skillful as you want to go, but at the end of the day, we're just rolling up a bunch of dried leaves to smoke them, which kind of reminded me of being a younger kid. I was always a pyro, lighting leaves on fire like an insane person.
This process, of course, is just more fine-tuned and has more purpose to it. Now the first thing to understand with cigar rolling is that there are three main layers to a cigar. You've got the filler which makes up most of the cigar. Then you have a binder which basically holds the filler together and finally the wrapper which is an outer leaf that wraps everything up and makes it look nice. Now one thing I haven't successfully been able to do yet is grow a good outer wrapping leaf. Wrapper tobacco basically has to be grown perfectly. You need very large, thin leaves which a lot of time is grown under shade cloth to keep them nice and smooth and delicate. Now I am working to
get to that level, but in the meantime I outsource the wrapper leaf. I'll buy this online just so they at least look nice and I'm totally fine with that cuz it's like 5% of the entire cigar. You're going to want some type of natural cigar rolling glue. There's different forms of this, but basically it's a plant-based adhesive. This is a chaveta which is a traditional cigar knife. It makes cutting the tobacco a lot easier, but you can definitely use scissors as well. And I would highly recommend a plastic cigar mold like this. You can roll a cigar without it, but for a beginner it's a lifesaver for getting a good shaping of your cigar. So the first thing I'm going to do is sort through
the leaves to make sure there's no mold growing. And if you do see any mold, you can just discard those leaves. We did notice some white spots on a few leaves and when I put them under the microscope, they turned out to just be little salt and mineral deposits from the curing process. And when these leaves come out of the humidor, they're still a little bit dry and brittle to work with. So I like to just spritz them with some water to hydrate them and just let them sit for about 10 minutes before rolling. Then I'll go through all of the leaves and cut out that central stem which is going to be the thickest and most disruptive part of the rolling process. And then I'm going to create
two different piles. One pile is going to be my best leaves, the ones that are the least damaged, the most complete pieces. And these are going to be used for my binder leaves. And then everything else is going to go in the filler pile which does not have to be that nice. And the first step in the rolling process is to start forming that filler. And I start by stacking pieces in my hand and it's really all based on feel. You're trying to get a very rough form of what you're eventually going to pack into the mold. And I find that this part is all about balance. If the leaves are packed too tight, the cigar won't draw and you won't be able to smoke it. But if it's too loose, you'll get these big air pockets and
it's going to be a very uneven burn. And really after the first one or two times I did this, you start to get a much better feel for it. And most importantly, you'll feel out what can actually fit into your mold size. And once the filler looks about right, I'll take a nice binder leaf and I'll start to wrap up that filler forming that very rough cigar shape. You're really just trying to bring everything together here. It's super rough. And if you need reinforcement in a spot, you can always just add another binder leaf. And I do like to add a little bit of that cigar glue at the end just to make sure everything stays together. Then you just pop that rough shape cigar in the mold which helps press everything
into that classic cigar shape. And you repeat that process with all of your tobacco. Now the molds really just need to sit for a few hours or ideally overnight. And this is the wrapper tobacco that I bought online and we're going to use it to finish the cigar and make everything look a little bit professional. First I'll unravel all those edges of the wrapper leaf. I'll cut out that center stem and then I'll trim off any rough edges. Then you take your cigar, you start at one end and slowly roll it up inside the wrapper while keeping everything very tight. Then I'll
add a little bit of glue to seal things up on the end. And there's a whole technique to forming that perfectly rounded cap at the end of, you know, every single cigar you've ever gotten. I don't even attempt to try this. I'm not on that level yet. Instead I just wrap the end closed which ultimately gets snipped off anyway when you cut the cigar before smoking. All right, so you didn't think I'd finish this video without sampling the product, right? So I'm actually going to try two cigars. Over here I have a cigar that's been aging for over a year from my previous harvest and then this is the recent harvest. It's still been aging for like five months. I thought it'd be really interesting to try them both to
see if I could tell the difference. And of course this is for research purposes. I am not promoting smoking. Most of the audience here is used to this channel, of course, as cooking. Now there's been a lot of gardening within the last few years. I did put out a video on cigar making. It was a short video about two years ago and it went super viral. It was one of my most popular videos of all time and so many people were very interested just as I am in this process. But of course there were also plenty of negative comments and people are going to judge however they're going to judge. There's nothing I can do about that. My personal take is that human beings have been using plant compounds to alter
their state for pretty much forever. Whether it's brewing up plants to make some alcohol, brewing up plants for caffeine, or in this case, smoking tobacco for the nicotine. There are not many people that don't use something to alter their state from time to time. I think for me, what I find important is my relationship I have with these products. That's why I've taken the route of using things that I only process myself, that I have a strong connection with, whether it's alcohol or tobacco in this case. That has been my personal goal and that's why this entire process, I got a few cigars in for me, that's plenty for the entire year. I haven't actually smoked a cigar, I think, in I don't know, maybe over a
year since I had my son about 10 months ago. So I used to use these products more when I was younger, but now it's on occasion for, you know, special events or whatever the scenario is, like right now. So we'll start off with the less aged cigar. It's really nice. Smokes really well. The first time I smoked my own cigar, I was shocked with just how smooth and fresh tasting. Not fresh in the sense that it was fresh leaves cuz of course it's aged. Kind of just fresh, clean, different than other cigars that I had smoked in the past. And a little bit more mild which I like. I don't want a ton of nicotine. I want to be able to enjoy this without getting, you know, super messed up. That's really nice. And it's not super
even, but overall it's drawing pretty nice. The first cigar I ever rolled, I rolled it way too tight cuz I didn't know what I was doing and I barely could smoke it. So rookie mistake. This thing is perfect. All right, I would love to just enjoy more of this, but for research purposes, we're moving on. This is also pulling very nice and I'm officially starting to feel it. I will say they're both pretty much the same smoothness level. This one has a slightly more robust tobacco flavor, like more what you would be used to, a little more classic. Whereas this one was very mild. And I wouldn't say I prefer one over the other. They're just different in that way. But this one's a little deeper in flavor. Could have
something to do with the wrappers as well, of course they're different tobaccos, but I think the longer aging is the main culprit. A one year process from a little sprout to this. Was it worth it? My personal favorite, you could call them hobbies or just things to do, are long-term projects. It's why I love fermentation so much, which is funny that tobacco does involve fermentation. And that's why I love this process so much and definitely think it's worth it. And we'll definitely continue to do it moving forward. And I love getting better at things as well. That's cool, too. And this is something where the learning curve takes time. Takes years.
All right. I'll enjoy this in peace. See you later.
Read the full English subtitles of this video, line by line.